1. Understanding the Camera Roll Iphone: Your Visual Memory Bank
The camera roll iphone is a core component of Apple’s Photos app, serving as a digital repository for all your captured memories. It functions as a comprehensive database where every photo and video you take with your iPhone or import to it is stored in chronological order. This feature dates back to the early days of iPhones, although its name has evolved over time to simply “Photos” within the Photos tab.
The Camera Roll houses all visual content, including Live Photos, panoramic shots, bursts, slow-motion videos, and even screenshots. Each image or video is timestamped and geotagged (if location services are enabled), providing context to when and where they were taken.
Apple’s intelligent software also enables features like facial recognition, grouping similar photos together under “Moments,” “Collections,” and “Years.” This helps users navigate through their extensive libraries quickly and find specific images more efficiently.
Additionally, the Camera Roll is interconnected with iCloud, allowing seamless synchronization across all your Apple devices. If you opt for iCloud Photo Library, your Camera Roll not only stays on your iPhone but also gets backed up online, ensuring that your precious memories are safe and accessible from any device logged into the same Apple ID.
In essence, the camera roll iphone isn’t just a folder; it’s a sophisticated system that combines storage, organization, editing capabilities, and cloud integration, making it an indispensable tool for managing and cherishing your digital life’s visual narrative.
Navigating through your iPhone’s Camera Roll is an intuitive process designed to help you find, manage, and enjoy your photos and videos with ease. Here’s a step-by-step guide: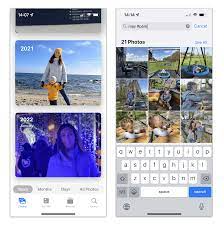
Step 1: Open the Photos App
- Unlock your iPhone and locate the “Photos” app, which typically comes pre-installed on your device and features a multicolored pinwheel icon.
Step 2: Accessing the Camera Roll Iphone
- Tap on the “Photos” app to open it. If you’re using the newer iOS versions, you will be taken directly to the “Photos” tab which includes all your media in chronological order (this is what the old Camera Roll used to be). In earlier iOS versions, look for the “Camera Roll” album within the Albums view.
Step 3: Browsing Your Media
- Scroll up or down to browse through your images and videos. You can use the pinch-to-zoom gesture to see more or fewer items at once.
Step 4: Organize by Moments, Collections, and Years
- By default, your media might be organized into ‘Moments’ (grouped by date and location), ‘Collections’ (groups of related moments), and ‘Years’ (larger groupings of collections). Swipe left or right to switch between these views.
Step 5: Search and Filter
- Use the search bar at the top of the screen to search by keyword, location, or even people recognized in your photos if you have this feature enabled.
Step 6: View Specific Albums
- Tap on the “Albums” tab at the bottom to view specific albums like Selfies, Screenshots, Live Photos, etc., or any custom albums you’ve created.
- To edit a photo or video, tap on it to open it full-screen, then tap the “Edit” button. For sharing, tap the share icon (a square with an arrow pointing upward) to send via messages, email, social media, or other options.
Step 8: iCloud Integration
- If you’ve set up iCloud Photo Library, you can also access synced photos from other devices by swiping down from the top of the “All Photos” view and selecting “All iCloud.”
Remember, Apple frequently updates its software, so some details may vary depending on your iOS version. Always check for the latest updates to ensure you’re utilizing the most current navigation tools available.
3. Organizing Your Camera Roll
Apple provides several tools to keep your Camera Roll organized:
- Folders: Create albums to categorize your images. For instance, you could create separate albums for vacations, family events, or work projects.
- Smart Albums: Utilize automatic Smart Albums like “Favorites”, “Recently Deleted”, and those based on location or people identified using face recognition technology.
- Search: The powerful search function allows you to find specific photos by date, location, keywords, or even objects detected within the images.
4. Editing Photos in the iPhone Camera Roll: Enhance Your Memories
The iPhone’s built-in Photos app allows for basic to advanced editing of your Camera Roll photos, right from your device. Here’s how you can edit a photo:
Step 1: Accessing the Photo
- Open the “Photos” app and navigate to the photo you wish to edit. You can find it in the “Photos” tab or within an album.
Step 2: Starting the Edit Process
- Tap on the photo to view it full screen. Then tap the “Edit” button located at the top-right corner of the screen. This will bring up the editing tools.
Step 3: Adjustments
- The editing interface provides several options:
- Crop & Rotate: To crop the image, pinch or drag the corners. Use the rotate icon to turn the picture.
- Light: Adjust brightness, exposure, highlights, shadows, contrast, and black point to enhance the overall lighting.
- Color: Tweak saturation, vibrance, warmth (temperature), tint, and color balance.
- B&W: Convert the photo to black and white with adjustable intensity and filters like Noir, Silvertone, or Sepia.
- ** Brilliance**: Affects overall image intensity without changing colors too much.
- Shadows/Highlights: Target specific areas for brightening or darkening.
Step 4: Additional Tools
- Under the More menu (three horizontal lines), you’ll find additional adjustments like sharpness, definition, noise reduction, and vignette.

Step 5: Filters
- Swipe left or right at the bottom of the screen to apply different filter styles that instantly change the mood and tone of your photo.
Step 6: Auto Enhance
- If you prefer automatic adjustments, tap the magic wand icon to let the app automatically optimize your photo.
Step 7: Saving Edits
- Once you’re satisfied with the edits, tap “Done.” You’ll be prompted to either “Save Changes” which will overwrite the original photo, or “Cancel” to discard changes.
Step 8: Revert Edits
- Even after saving, you can revert back to the original version by tapping “Edit” again and then selecting “Revert.”
Editing your Camera Roll photos on the iPhone is a breeze and empowers users to refine their memories without needing a separate photo editing app. However, if you need more advanced features, there are many third-party apps available in the App Store.
5. Sharing from the Camera Roll
Sharing your Camera Roll pictures is simple. Select one or multiple photos, tap the “Share” button, and choose from various options including email, messaging, social media platforms, AirDrop, or iCloud Photo Sharing. You can also share links to entire albums or Live Photos.
6. Backing Up and Syncing Your Camera Roll
iCloud Photo Library automatically backs up your Camera Roll to iCloud, ensuring that your photos are safe and accessible across all your Apple devices. You can also configure the settings to optimize storage by keeping lower resolution versions on your device while storing full-quality originals in iCloud. Alternatively, you can connect your iPhone to a computer and sync your photos via iTunes or use third-party cloud services.
7. Managing Storage and Deleting Photos
With the abundance of high-resolution photos and videos, managing storage becomes crucial. iOS offers tools to help free up space, such as ‘Optimize iPhone Storage’ which stores compressed versions locally. To manually manage your Camera Roll, you can delete unwanted photos directly from the app or move them to the Recently Deleted album where they’ll stay for 30 days before permanent deletion unless removed earlier.
In conclusion, the iPhone Camera Roll is a dynamic feature that not only stores your visual memories, but also empowers you with organization, editing, sharing, and storage management capabilities. By understanding and utilizing these features, you can better control your photographic narrative. And maintain a well-organized digital archive of life’s moments.